


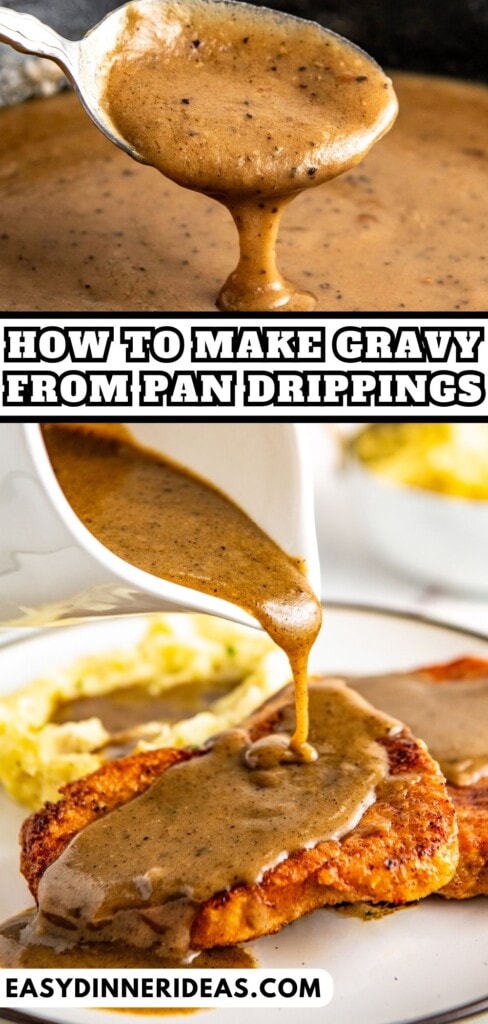
Rich, smooth, and so savory, this homemade gravy from drippings is so dang good that you’ll be licking your plate clean! Learn how to make gravy from drippings in just 10 minutes and take your dinner to a whole new level.

Why This Is the Best Gravy From Drippings
Thick and velvety, this decadent pan gravy will make any piece of meat instantly better. Making gravy from drippings is so easy, and it’s a great way to maximize all the flavor from whatever meat you cooked for dinner. Here’s why this is our go-to homemade gravy recipe:
- Fast & Easy: This luscious gravy is super easy to make in just 10 minutes. Once your meat is cooked, we whisk in a little flour, seasonings, and broth into the pan drippings. We simmer our gravy until it has thickened and that’s it, it’s ready to serve!
- Mess-Free: This pan gravy from drippings is such a great way to add flavor to your meal without making your kitchen any messier. If you make the recipe right after cooking a piece of meat, you can just make the gravy directly in the same pan.
- Maximize Flavor: Anytime you cook a piece of meat, you leave so much flavor in the pan. When you make gravy from drippings, you get to use that flavor instead of wasting it!
- Use Any Meat: This is a versatile gravy recipe, so you can use the drippings from any meat. You can make beef, pork, chicken, bacon, or turkey gravy from drippings.
- Better Than Store-Bought: There’s simply no comparison between homemade gravy from drippings and store-bought gravy. This gravy will have a meatier and deeper flavor, with an irresistible smooth and velvety texture, than any store-bought gravy you’d find at the store.

Ingredients Needed
You only need a few basic pantry staples that you probably already have on hand to make gravy from drippings. For full ingredient amounts and directions, scroll to the printable recipe card at the bottom of this post.
- Pan Drippings: You can use drippings from any kind of meat.
- All-Purpose Flour
- Broth: Chicken or beef broth are best for this recipe.
- Salt
- Black Pepper: Always use freshly cracked pepper for the most flavor.
- Garlic or Onion Powder: This is an optional ingredient, but can add a lot of flavor to your gravy.

How to Make Gravy From Drippings
Whether you’re making homemade turkey gravy, pork gravy, or pan gravy with any other kind of meat, this sauce is rich, smooth, and packed with a deep, meaty flavor. And it only takes 10 minutes to cook! Scroll to the recipe card at the end of the page for detailed instructions on how to make gravy from drippings.


- Add Flour: Heat the pan drippings in a heavy skillet, then add the flour. Whisk until the roux turns a medium brown.
- Pour In The Broth: Slowly pour in the broth while whisking.
- Finish: Cook the gravy, while whisking, until it thickens. Season to taste and serve immediately.

Tips for the Best Homemade Gravy
Making rich and savory homemade gravy from pan drippings is so easy, but here are a few things you can do to ensure that it comes out perfectly every time.
- Whisk Thoroughly: Once you start making the gravy, it’s important to whisk continuously. If you’re not constantly whisking, the roux might burn, or the gravy might break. When you add the broth, the gravy might separate a little bit, but keep whisking until it comes back together.
- Season At The End: It’s really important to wait until you’re done cooking the gravy before you season it. Since your pan drippings will likely have salt from the meat you cooked and most broth has added salt, the gravy might be plenty salty without adding any extra salt. Once the gravy is done cooking, taste it, and adjust the seasonings as needed!
- Adjust The Thickness. You can easily adjust how thick this homemade pan gravy is, depending on your taste. If the gravy is too thick, add a splash of water, broth, milk, or cream. Adding milk or cream will make the gravy extra creamy and smooth. If your gravy is too thin, just cook it for a little bit longer.
- Add Flavors: Garlic and onion powder are included as optional seasonings for this savory gravy. Just a pinch will really add a lot of extra flavor! You can also add fresh or dried herbs like rosemary, sage, or thyme.

What to Serve With Homemade Brown Gravy
This hearty homemade gravy is so easy to serve. Our favorite way to eat it is with whatever piece of meat you’re using the drippings from and a side of mashed potatoes!
- Pork: As shown in these photos, this gravy is delicious over some breaded fried pork chops! We also love to serve it with these juicy pan fried pork chops.
- Chicken: A little chicken pan gravy would be amazing over these pan seared chicken breasts!
- Beef: Chicken fried steak is a classic with white gravy, but it’s also delicious with a light brown gravy made with the pan drippings. This easy smothered cube steak is another great option!

How to Store and Reheat Leftovers
This homemade gravy will last for up to 5 days in the fridge if stored in an airtight container. We don’t recommend freezing homemade pan gravy from drippings. The texture will really suffer if you freeze and then thaw the gravy.
You can reheat the gravy over medium heat on the stove, or in the microwave on 80% power in 20-second bursts. You’ll need to stir the gravy after reheating it. If your gravy has thickened too much, you can add a little broth to thin it out.

More Easy Gravy Recipes
If you’re a big gravy fan then we’ve got you covered. Here are some more of our favorite easy and comforting gravy recipes.
- Homemade White Gravy
- Chicken and Gravy
- Homemade Brown Gravy
- Beef Tips and Gravy
- Crockpot Chicken and Gravy

How to Make Gravy From Drippings
Ingredients
- 4 tablespoons pan drippings
- 4 tablespoons all-purpose flour
- 2 cups broth, chicken or beef
- ½ teaspoon garlic or onion powder, optional
- Salt and freshly black pepper, to taste
Want to save this recipe?
Instructions
- If using old pan drippings, heat the pan drippings in a heavy bottom skillet over medium-to-medium high heat.
- Once pan drippings are hot, add in the flour and whisk continuously so the flour does not burn. Keep whisking, and cook until the flour change colors to a medium brown, about 2 minutes. You can also start to smell the flour cooking when it’s ready.
- Slowly pour in the broth, while whisking continuously. At first everything will separate, but keep whisking making sure to stir the entire skillet.
- Continue cooking and whisking, until gravy thickens, about 3 to 4 minutes.
- Season with salt and pepper, to taste, and serve immediately.
⭐️ Tried this recipe? Leave a comment and rating! It only takes a minute and helps support our family-run blog. ❤️